Thursday, June 30, 2011

The Man with the Saxophone

Emotional Evolution...


Camera: Canon EOS 40D
Lens: Canon 70-20 f2.8


Camera: Canon EOS 40D
Lens: Canon 70-20 f2.8


Camera: Canon EOS 40D
Lens: Canon 70-20 f2.8


Camera: Canon EOS 40D
Lens: Canon 70-20 f2.8

Saturday, June 25, 2011

Back to the 70's


Just released the new and exciting Aging Film Presets for Lightroom, Photoshop & Elements!

The all-new Aging Film Presets are:
  • Kodak 70′s Blues – That “blueish” look of an old American family photo album
  • Agfa 70′s Orange Crush – That “orange” cast of the old European family photo album (yes, with the round cornered frame…)
  • Agfachrome 50 Style – The classic slide film is back!
  • Expired – Old, out of date film that looks great…
  • Grandma’s Memories – Just like that old photo that is hanging on grandma’s living room wall…
  • Kodachrome Style –  Because“Every thing looks worse in black and white”.
  • Polaroid Cool – Back to the old Polaroid photo, with its muted colors, turquoise cast, the whole pack.
  • Polaroid Dark Blue – Feels like teen spirit! Kicks the blues for a fresh look. 


Wednesday, June 8, 2011

Creating the "Look" for the Dancers Project - Session 2

An important stage of this project is the overall "look" of the photos.
In digital photography, you can create it on session or with post production in Photoshop. Because we wanted to young dancers to feel free, we decided not to overwhelm them with a lot of photo gear. This made us work with natural light only and shifted the creation of the "look" to the computer.
Let's roll...
In this step-by-step Photoshop tutorial, I will go through the essentials of creating your unique appearance of your photos.
Step #1 - Crop
I decided to use a ratio of 4/5. The camera's 2/3 felt to "stretched" this time:


Step #2 - Fix White Balance
Pick up the White Balance tool (1) and click in a neutral shadow to neutralize the white balance of the photo (2):


You can monitor the area you click on by checking the RGB values (3). If they are almost equal, it is a neutral area. Once you click on this spot, they will become equal.


Step #3 - Choose the Color Profile
This is a very important step. The color profile you choose, determines the way Photoshop (or Lightroom) renders the colors of the image. This is prior to any manipulations you will do further on.
In this case I chose the Pentax K200D profile for Canon 40D. This is possible when you use PSKiss Cross Camera Color DNG Profiles. This particular profile is helpful when you need to use as much dynamic range as possible with mild initial contrast and it doesn't increase saturation.
Switch to the Camera Calibration tab:


From the Camera Profile menu (Profile menu if you use Lightroom), choose Pentax K200D (this is available only if you have Cross Camera Color profile pack for your camera):


Step #4 - Setup the Basics
This might seem a little strange to some of you. Going to the Basic tab in step 4? Yes. No mistake. All the previous steps effect the basics of the image quite dramatically, so I adress them again only after I went through the first 3 steps.
Here's a little productive tip about the Basic tab. If you are not sure what to do with the Exposure and the Blacks sliders, hold down the Alt/Option key and click on each one them (one at a time...).
This will show you quickly where are the burned out and the totally black areas.
This is how it looks when checking the Exposure of this photo:


This shows that only the background is totally burned out so it is perfectly safe to open up the Exposure. I stopped at +1.00 EV:


Now it's time for the Blacks. Hold down the Alt/Option and check the Blacs:


This shows that nothing is totally black. This time I pushed it up to 7. I don't want this image to be too dark in the shadows:


That's it for this one. In many cases I would do more in this tab, but this time is a bit different...

Step #5 - Open as Smart Object
This is one of my favorites workflow techniques in Photoshop because it allows me to go back to ACR when ever I want to. This keeps me working from the Raw data instead of manipulating final pixels. Better quality and much easier to handle. It always remembers what you've done. I love it...
Click on the Workflow Options line at the bottom of the ACR window:


Mark this option in the pop-up window:


Click OK and the click Open Object:


Step #6 - Duplicate the Smart Object
In Photoshop, go to the Layers panel, right-click under the layer's name and duplicate the Smart object using this command (do not duplicate it as if it was a regular layer. It isn't!):


The result:


Step #7 - Create a Tone Map
The final "look" of this image will be created by using a grayscale version of this photo, blended with the colored version.
To create a grayscale version, simply double-click the duplicated Smart Objects (the top layer).
This will open ACR window again. Go to the HSL tab, convert to Grayscale (change the luminosity of the colors until you get the image you want):


To add some "spice" to this look, I switched to the Effects tab, added some Grain and a soft Vignette and clicked OK:


Step #8 - The Final Touch
For the final touch, I changed the blend mode of the B&W layer to Soft Light and lowered the opacity to 60%:


The first color developed image:


The final image:


The Closing Tip
If you want to apply these develop settings to more images (of the same session or any other), simply save the settings of each develop stage:


Don't forget to name it wisely so you will be able to figure out what it does in the future...


For more information about Cross Camer Color profiles for Photoshop, Lightroom and Elements, Click Here.

Monday, June 6, 2011

Another Session of Young Dancers Project

Here are the first "early birds" from the last session of our Young Dancers Project:


Details about the post production will be posted later this week.

Wednesday, May 4, 2011

Young Dancers - Some Lightroom Post Production

During the shootout we realized that one of our lenses got "foggy".
In old film days, this would have been a session terminator. We decided to continue the session at the risk of re-doing it in another day. Definitely not a disaster...
This post is actually a free Lightroom tutorial for rescuing foggy photos.

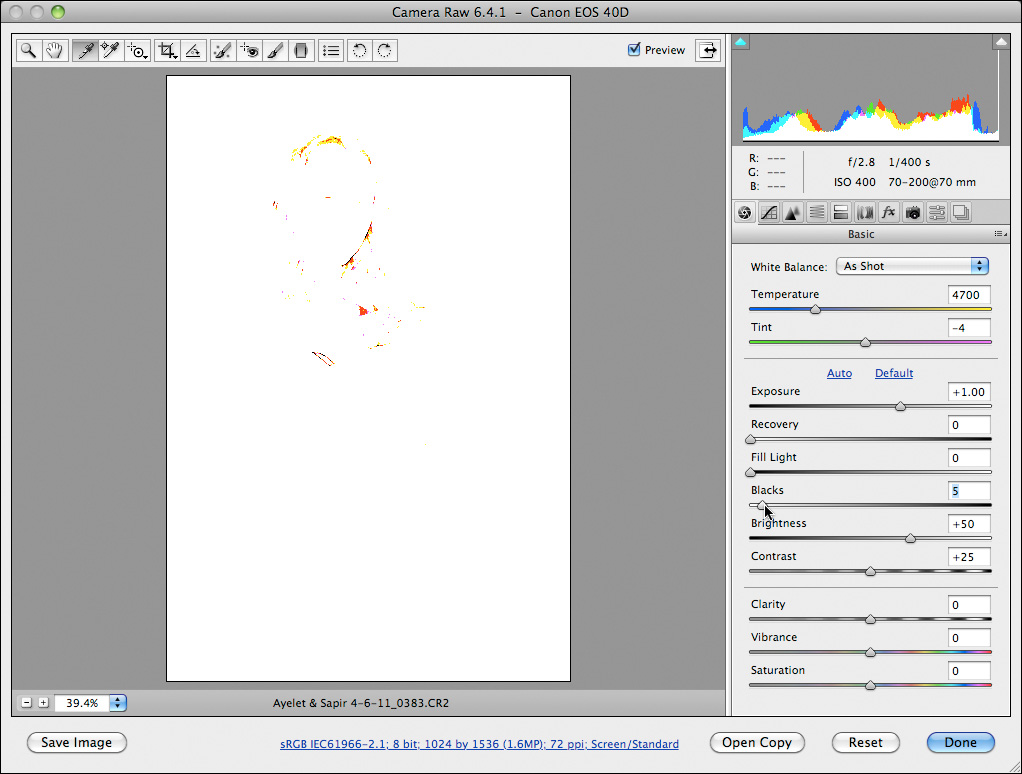
The original foggy photo looked like this:

Lets start working in Lightroom
A quick glance at the histogram reveals most of the problem - no shadows:


The first step will be to add some shadows with the Blacks slider in the Basic tab:

Actual values might be different with other photos. After darkening the Blacks, you might need to increase Exposure.

What about some color?
To change the general "look" of the photo I chose Leica M8 out of PSKiss Cross Camera Color Profile pack for my camera. I found out that this color profile was best for this session.
I switched to the Camera Calibration tab and picked Leica M8 from the Profile menu:

Fine Tuning Colors in Lightroom
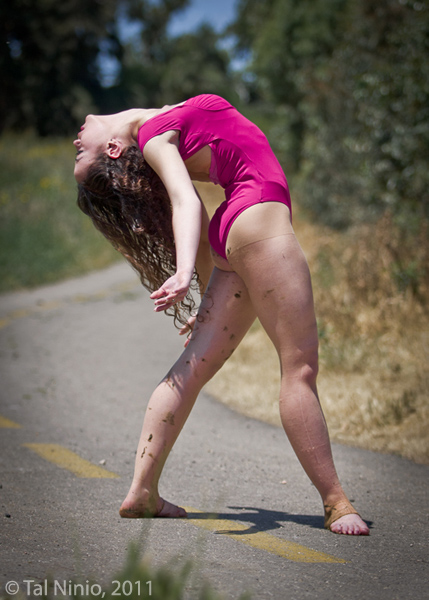
The color profile I chose, changed the pink color of her Dancer's leotard. In addition, I don't like the "plastic" appearance of the greens of this photo, so some fine tuning will be necessary. To do so, I switched to the HSL tab and fixed the Hue of the Reds:

The next step was to desaturate the Greens, the Reds ans the Oranges:

Actual values might be different with other photos

Final Tone Curve Adjustments in Lightroom
To give the image its final tonal range, switch to the Tone Curve tab and adjust the curve.
In this image (as in many others...), I used the "button" next to the curve area so I could click and drag on the areas I wanted to adjust and let the curve move by it self:

Local-contrast with Clarity
For the "final touch" I decided to increase local-contrast using the Clarity slider in the Basic tab:
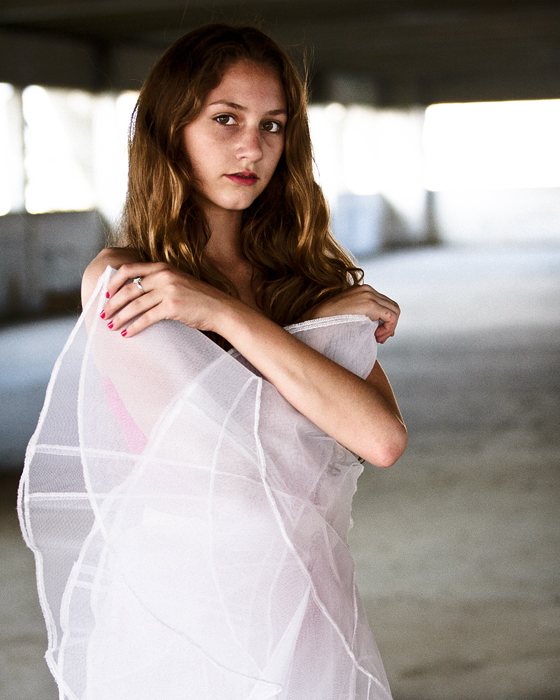
The Final Image


Tuesday, April 26, 2011

Young Dancers - On Going Photo Project

How did this start?
My daughter is a dancer. She also loves to photograph dancers.
Now combine this with her father's photography and image editing enthusiasm. Where does it go to?
Exactly. A joint project. A father and daughter reunion, if you like...

My beautiful daughter in action:

The Process
The work process in this photography project is fascinating for me. The girls choose the locations, the outfits and the staging. At this stage, I am just a consultant (and the driver...). We decided to use only natural light.
Then we start the shootout. Both of us are shooting, using different camera bodies, different lenses and shoot from different angles. This way we don't step on each other's toes... It is a very interesting experience because photography is actually an individual creative process, so how can it be done in couple? Well, with some patience and tolerance it can be done and we found out that it is very-very pleasing.
After we get back home, we check the photos, trash the wrong ones, sort them and post process them.

The First Location
As mentioned, the girls picked up the location - an open field right outside our hometown:


The Shootout
Here are some samples of the photographs. I will post more samples during the week:


All images shot as Raw, developed with Photoshop CS5

Monday, April 11, 2011

Self Portraits - One hell of a Challenge...


Self portraits are quite a challenge for any amateur or professional photographer.
I've been struggling with this issue for quite a while now and still, not sure what is the definition of a self portrait. 
Is it a well planed studio photo with perfect lighting and perfect intention?


Should the photo have a well pronounced message?


Should it spontaneous?


Is it a snap shot taken somewhere?


Maybe it is a collection of photos from my close living environment?...?


Well, I guess it's a little bit of each and more...
In this never-ending-journey of seeking my "self portrait", after getting a mail from Artist Wanted I decided to combine some photos and create a small portfolio in their very interesting project The Power of SELF.
Some more samples of this on-going project can be found in my Self Portraits galley at pbase.

All photos are shot as Raw files and enhanced with PSKiss Productivity Filters and PSKiss Pixel Gear Suite.